SIWYS Integration Guide
1. Introduction
1.1 What is SIWYS?
Sign in with SELF is a decentralized authentication tool that allows users to securely access applications while maintaining full control over their digital identity. By leveraging self-sovereign identity and verifiable credentials, it empowers users to authenticate without relying on centralized services or sharing unnecessary personal information.
Traditional systems rely on third parties like Google, Facebook, or password databases to verify user identities, creating a “single point of failure” and exposing their personal information to potential breaches. In contrast, SIWYS places the user at the center of the process, eliminating the need for intermediaries.
What truly sets SIWYS apart is how it optimizes user autonomy. Each authentication challenge is fully transparent, showing exactly what information is being requested. Users and businesses retain complete control over their data, deciding what to share and with whom.
1.2 How it Works
When a user visits a site that supports SIWYS (Sign In With Your SELF), instead of entering a username and password, they're prompted to respond to a challenge. The challenge requests proof of their identity ownership.
In some cases, the challenge may also request molecules—verifiable credentials—along with specific preferences for which issuers have attested them.
For example:
- A healthcare platform might request proof of a medical license issued by a trusted medical authority.
- An age-restricted site could ask for proof that a user is over 18 as attested by a government authority.
Before responding, users can review the challenge in their identity wallet. This includes details about what information is being requested and any issuer preferences. Users can then choose whether or not to create a response.
If they decide to accept the challenge, a response is generated and cryptographically signed with their private key. This signed response is sent back to the application. The client (application) can then:
- Verify the response’s authenticity by checking the cryptographic signature.
- Review the information included in the response.
Based on this verification, the client determines whether to authenticate and grant access.
1.3 Why Integrate SIWYS?
1.3.1 Security Enhancements
-
Eliminates passwords: No password management, reducing the risk of phishing and credential theft.
-
Cryptographic proof: Authentication is based on cryptographic signatures, ensuring high-level security.
-
Resilience to attacks: Decentralized architecture eliminates single points of failure common in centralized systems.
1.3.2 User Control & Privacy
-
Self-sovereign identity: Users maintain full control over their digital identity and credentials.
-
Selective data sharing: Users can share only the specific information (molecules) requested, minimizing unnecessary data exposure.
-
Privacy by design: No need to store sensitive data on centralized servers, reducing the risk of breaches.
1.3.3 Flexibility & Customization
-
Molecules (verifiable credentials): Supports any type of molecule, from age verification to professional licenses, with issuer-specific preferences. Creates a deeper level of authentication past just account presence.
-
User-driven identity: Users can manage credentials from multiple issuers, enabling diverse use cases across industries.
1.3.4 Reduced Risk & Liability for Applications
-
No data storage: Applications don’t need to store user credentials, reducing liability and compliance burdens.
-
Mitigated compliance risks: Helps meet privacy regulations like GDPR by minimizing data collection.
-
Improved security posture: Reduces exposure to breaches and attacks targeting user data.
1.3.5 User Experience Improvements
-
Faster login: Users can authenticate within a few clicks/taps.
-
Faster onboarding: No need for users to create and manage multiple accounts or remember passwords.
1.3.6 Scalable & Future-Proof
-
Decentralized infrastructure: Scales without the bottlenecks of centralized systems.
-
Future-ready: Built on open standards and decentralized technologies, making it adaptable to evolving digital identity needs.
1.3.7 Transparency & Trust
-
Transparency: Users and businesses see exactly what information is being requested and shared.
-
Trustless verification: Applications can verify credentials without relying on a third party.
-
Data integrity: Credentials are cryptographically signed, ensuring authenticity and tamper-proof verification.
2. Use Case Examples
The following use cases are instances where SIWYS has been implemented already but is by no means an exhaustive list.
2.1 KYC
-
Financial services: Banks and fintech apps can request KYC verifiable credentials to meet regulatory requirements.
-
Cryptocurrency platforms: Users can share verifiable credentials to comply with KYC/AML regulations without revealing excess information.
-
Social Media platforms: Users can share verifiable credentials that prove they are human and not a bot.
2.2 Business/Corporate
-
Employee access: Secure login to enterprise systems with verifiable employment credentials.
-
Partner portals: Partners can authenticate using specific credentials, ensuring secure access to B2B platforms.
2.3 Web3
-
Token-gated communities: Users can prove ownership of specific NFTs or tokens to access exclusive events or content.
-
DAO membership: Authentication for DAO participation by proving membership.
2.4 Events and Ticketing
- Event access: Attendees can verify identity or ticket ownership through a verifiable credential.
2.5 Education/Certification
-
Online courses: Students can verify enrollment or certifications for access to educational resources.
-
Professional certifications: Platforms can request proof of certification or training completion for specialized roles.
3. Implementation Overview
-
SIWYS involves generating challenges via MDIP, displaying the challenges to users, and fielding responses to the challenges. The challenge response contains the data requested of the user, and is necessary to fulfill some task in your application. Some examples of this are onboarding, requesting a user’s birthdate, requesting a user’s email, etc.
-
Fully implementing SIWYS requires a Keymaster service for signing challenges on behalf of your company or entity, UI code for displaying the signed challenges, and a MDIP node for interaction with the MDIP network.
-
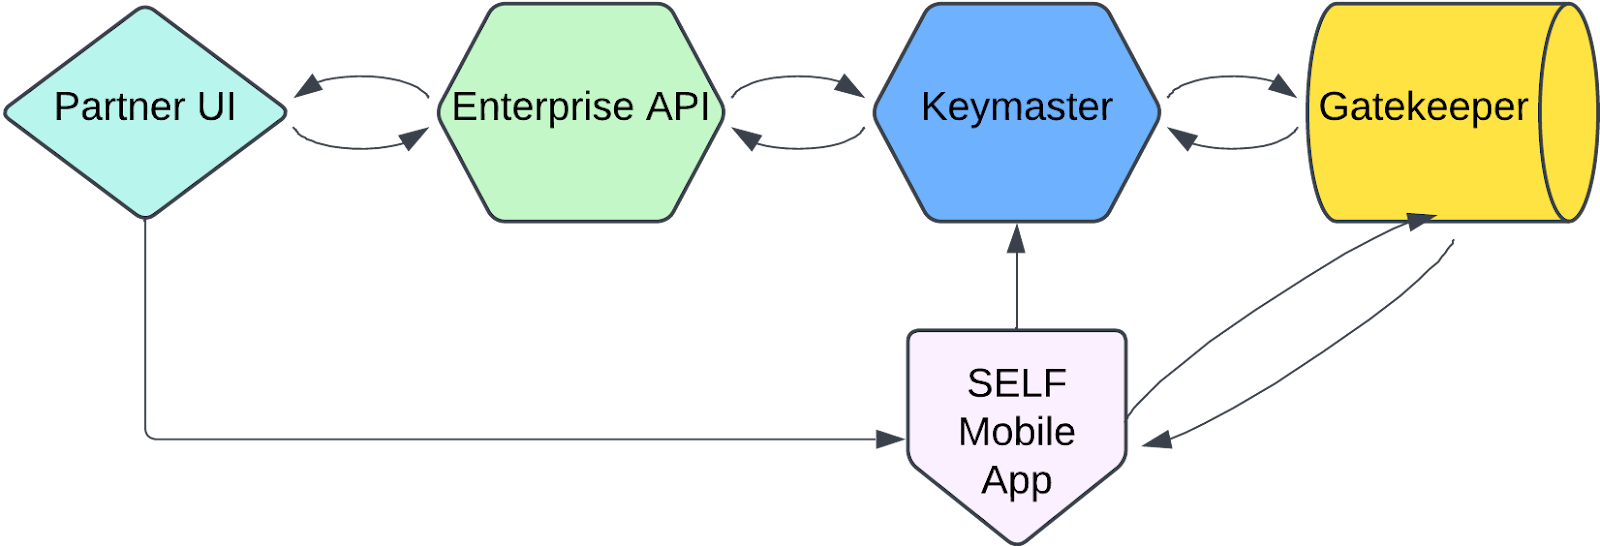
This can be accomplished using the SIWYS SDKs and a series of docker files. There are several options for implementation that offer various advantages and disadvantages, and it’s up to you to decide which option and strategy is right for you given your business needs, infrastructure strategy, and security posture. Regardless of your implementation strategy, the SIWYS flow generally looks like this:
-
A user clicks the SIWYS button on a partner webpage, which then renders the challenge generation component.
-
The UI requests a challenge from the partner’s Keymaster service, which signs a transaction and submits it to the MDIP network via the partner’s gatekeeper node.
-
The Keymaster service sends a response to the partner UI containing the challenge DID and the challenge is displayed to the user via QR code.
-
The user then takes the SELF app and scans the QR code or clicks the app link button on the screen, which loads the challenge DID in the SELF app and fetches the associated challenge data from the MDIP network.
-
The user can now see what data has been requested from the partner application and can decide to respond or not. If they proceed with the response, then a response is generated via the MDIP network and the DID of the response is sent via HTTP and the challenge’s callback URL field to the partner’s Keymaster service.
-
Once the response DID has been received by the partner’s Keymaster service, the Keymaster service then requests the associated response document from the MDIP network. The Keymaster service then decrypts the response data using its wallet and completes whatever business logic it needs to do for the given flow. This typically looks like creating or updating a user in the system or something similar.
-
Finally, when the business logic is complete, the partner Keymaster then needs to update the partner UI to notify the user that the flow is complete and either grant them access to authenticated application routes or ferry them along to the next step in a user flow.
-
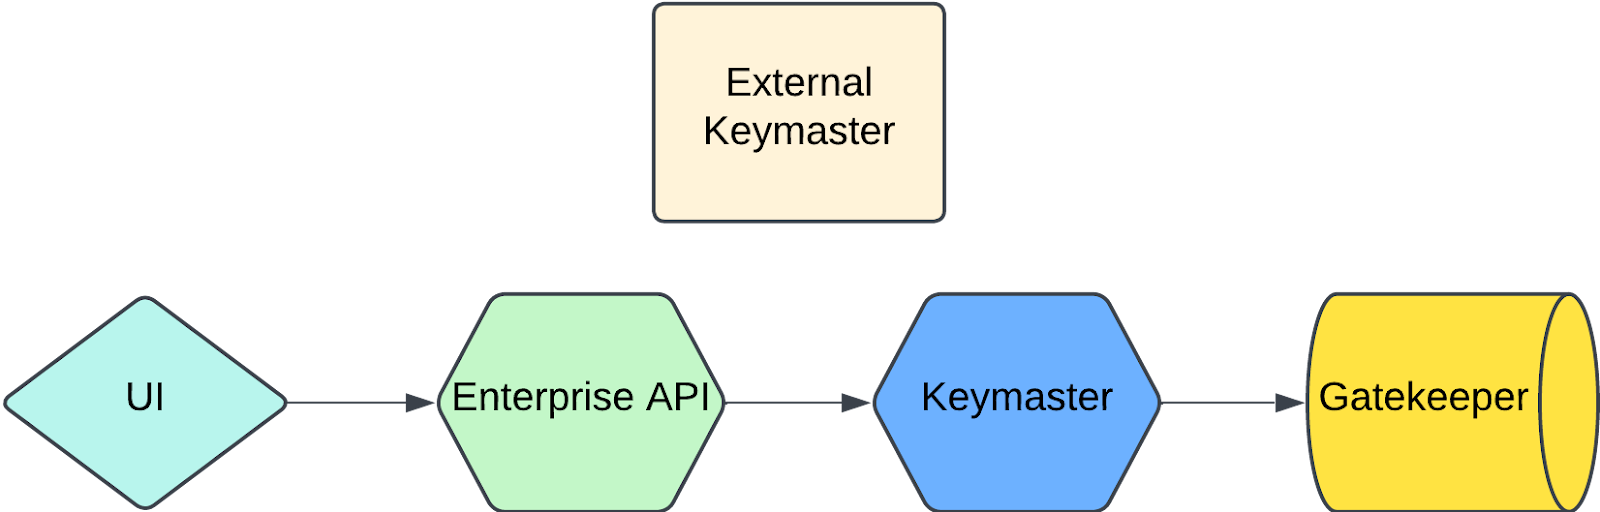
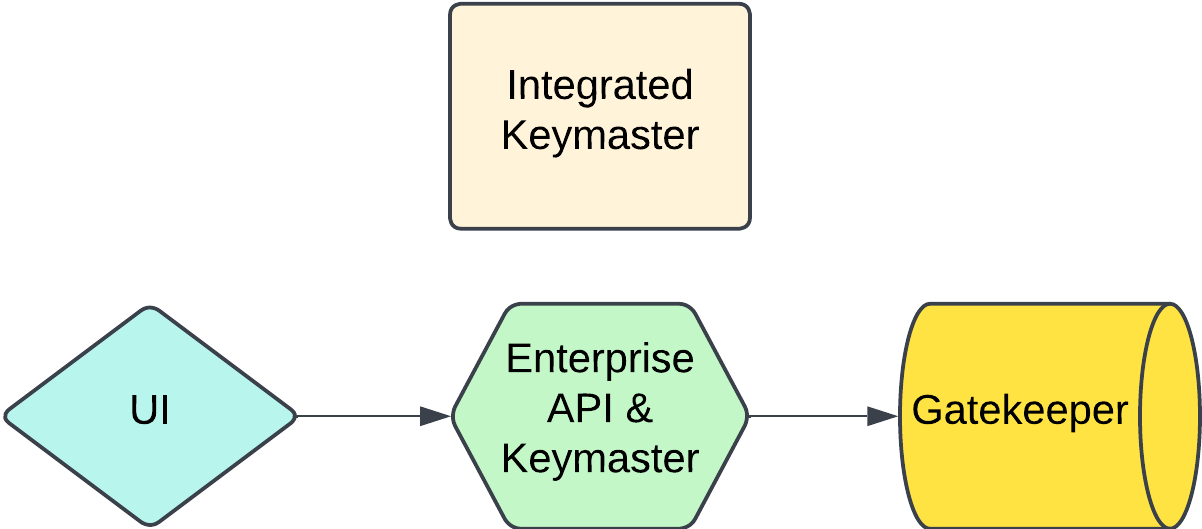
4. Keymaster Setup
Overview
- Operating a Keymaster service facilitates interaction with and signing of transactions on behalf of an entity that has adopted the SIWYS authentication paradigm. This requires running a Keymaster on its own or integrating Keymaster functionality into an existing server. Additionally, your Keymaster service will need to interact with a MDIP gatekeeper node. You can run a node yourself or use one offered via a third party service.
Implementation
- There are two ways to run Keymaster functionality for your application and each option has its own set of benefits and drawbacks. Your choice will depend on what most aligns with your engineering organization’s policies and strategies surrounding application security and architecture. Below is a breakdown of each option with the pros and cons of each approach.
Integrated Keymaster
-
Overview
-
Using the SIWYS-API-JS SDK you can turn any NodeJS application into a functioning Keymaster. This involves adding new routes and associated server logic to your application that facilitate the generation of challenges and reception and handling of challenge responses.
-
Summary
- Embedded within existing services
- Keymaster routes are added to existing APIs
- Direct function/library calls rather than network calls
- More tightly coupled with partner systems
- Operates more like a library
-
-
Pros
- Lower latency (direct function calls)
- Simpler deployment (part of existing services)
- Less infrastructure overhead
- Easier integration with existing authentication
- No need for additional network security measures
-
Cons
- Tighter coupling with partner systems
- Updates may affect entire service
- More complex to maintain clean separation of concerns
- May complicate existing codebases
External Keymaster
-
Overview
- Runs as a separate service/component
- Has its own dedicated API endpoints
- Partner services communicate with it via internal network calls
- Maintains clear separation of concerns
- Operates more like a microservice
-
Pros
- Better separation of concerns
- Easier to update/maintain independently
- Can be scaled separately
- Clearer security boundary
- Easier to monitor/audit Keymaster-specific operations
- Can be deployed as a standalone service
-
Cons
- Additional network overhead
- More complex deployment architecture
- Need to handle inter-service communication security
- Requires additional infrastructure
- Potential latency issues
5. API Setup
Complete README can be found here: https://www.npmjs.com/package/@yourself_id/siwys-api-js
1. Install
npm install @yourself_id/siwys-api-js
or
yarn add @yourself_id/siwys-api-js
2. Initialize Keymaster based on your use case
a. Integrated Keymaster
Integrated Keymaster requires integrating Keymaster functionality into your existing server. To acheive this you will need to communicate to an existing Gatekeeper service and provide the necessary configuration for managing your digital Wallet.
Initializing a Keymaster client is as easy as creating a class instance of Keymaster
import { Keymaster } from "@yourself_id/siwys-api-js";

const loadWallet = () => {
  // pull stored wallet from secrets manager, s3/cloud storage, etc
};

const saveWallet = () => {
  // save updated wallet from Keymaster to wherever it's stored
};

Keymaster.initialize({
  gatekeeperConfig: {
    url: "https://gatekeeper-url",
  },
  walletConfig: {
    id: "my-wallet",
  },
  walletDb: {
    loadWallet,
    saveWallet
  },
});
b. External Keymaster
If you want your server to simply communicate with an existing, external Keymaster you just need to provide the Keymaster config.
import { Keymaster } from "@yourself_id/siwys-api-js";

Keymaster.initialize({
  keymasterConfig: {
    url: "https://Keymaster-url",
    chatty: true,
    waitUntilReady: true,
    intervalSeconds: 5
  },
})
3. Start Keymaster service
The Keymaster client must be manually started once it has been configured.
The easiest way to do this is to start it when your server starts up.
import express from "express";
import { Keymaster } from "@yourself_id/siwys-api-js";

const app = express();

app.listen(8080, () => {
  await Keymaster.start();
});
You can keep a global reference for easy reuse where you need it
import { Keymaster, KeymasterConfig } from "@yourself_id/siwys-api-js";

const loadWallet = () => {
  // pull stored wallet from secrets manager, s3/cloud storage, etc
};

const saveWallet = () => {
  // save updated wallet from Keymaster to wherever it's stored
};

let Keymaster: Keymaster;
async startKeymaster () => {
  Keymaster.initialize({
    gatekeeperConfig: {
      url: "https://gatekeeper-url",
    },
    walletConfig: {
      id: "my-wallet",
    },
    walletDb: {
      loadWallet,
      saveWallet
    },
  });

  await Keymaster.start();
};

startKeymaster();
4. Add SIWYS Endpoints
The SIWYS workflow is as follows:
-
User clicks the SIWYS button and a challenge is rendered via a QR code
-
The user completes the challenge via scanning the QR code in their SELF mobile app
-
The mobile app executes the specified callback function for the challenge on a successful scan
-
Optionally, the UI can poll for challenge completion and perform the appropriate steps once complete
You need to add the following endpoints to help facilitate this workflow.
Create Challenge
app.post("/challenges", async (_, res) => {
  // callbackUrl should be the endpoint defined in Step 3 (above)

  const callbackUrl = "http://your-server-url/auth";
  // use the Keymaster service you started earlier
  const challenge = await Keymaster.createChallenge({
    callback: callbackUrl,
  });

  res.json(challenge);
});
Accept Challenge Callback
The endpoint the SELF app will hit to signify a completed Challenge.
Note: This endpoint MUST be publicly accessible as the callback will be executed from the SELF mobile app on the user's device.
import { collection, doc, setDoc } from "firebase/firestore";
import { VerifyResponseResponse } from "@yourself_id/siwys-api-js"

app.post("/auth", async (req, res) => {
  // parse the response from the request body
  const { response } = req.body;

  // verify the response
  const verified: VerifyResponseResponse = await Keymaster.verifyResponse(response);

  if (verified.match) {
    /**
     * match = authentication is successful
     *
     * You should implement the necessary DB logic here for caching this
     * "user login session". A "user login session" can be represented by the
     * challenge DID that was generated paired with the responding user's agent DID
     * who completed the challenge.
     *
     * The `verified` response contains a "responder" field that
     * represents the user's agent DID. This is the uniquely
     * identifying ID for the user.
     *
     * A minimal example has been included below that will
     * cache the challenge and create the user in Firestore.
     */
    const challengeId = verified.challenge
    const userId = verified.responder

    // cache challenge - this will vary depending on your implementation
    await setDoc(doc(collection(db, "challenges"), challengeId), verified);
    console.log("Created challenge document with ID", userId);

    // create user - this will vary depending on your implementation
    await setDoc(doc(collection(db, "users"), userId), verified);
    console.log("Created user document with ID", userId);
  }

  res.sendStatus(204);
});
Poll for Challenge Complete
Optionally, you can configure the SIWYS React component to poll for a completed challenge by specifying the polling URL.
If you omit this, you will need to implement the challenge completion logic yourself. For example, you could push a message via WebSocket to the front-end when the challenge has been completed during the callback (above).
Note:
- The polling logic in the React component will pass the Challenge DID via a query parameter.
- The polling endpoint must return a 2xx status on success with a JSON
- The polling endpoint should send the data associated with the successful challenge response. This is up to the developer to decide what it looks like given their application’s business logic.
import { collection, doc, getDoc } from "firebase/firestore";

app.get("/auth", async (req, res) => {
  // parse the challenge from the query string
  const challengeId = req.query.challenge;
  if (!challengeId || typeof challengeId !== "string") {
    return res.sendStatus(400);
  }

  /**
   * You should implement the necessary DB logic here for looking up
   * an active "user login session". You can refernce the cached challenge
   * created in the callback endpoint from above.
   *
   * A minimal example has been included below that will fetch the challenge
   * and user from Firestore.
   */

  const challengeDoc = await getDoc(doc(db, "challenges", challengeId));
  if (challengeDoc.exists()) {
    console.log("Found challenge document with ID", challengeId)
    const docData = challengeDoc.data()
    const userId = docData.responder
    const userDoc = await getDoc(doc(db, "users", userId));

    if (userDoc.exists()) {
      console.log("Found user document with ID", userId)
      const userData = userDoc.data()
      // you add any authentication logic here
      // eg create a cookie and return in result
      res.json(userData);
    }
  }

  res.sendStatus(404);
});
5. Complete Example
Below is a complete, minimal example using Express and Firestore
import express from "express"
import { collection, doc, getDoc, getFirestore, setDoc } from "firebase/firestore";
import { Keymaster, Wallet } from "@yourself_id/siwys-api-js";

const app = express();
const db = getFirestore() // firestore init logic

const walletCollection = "wallet"
const walletName = "server-wallet"

async function loadWallet(): Promise<Wallet | null> {
  const walletDoc = await getDoc(doc(db, walletCollection, walletName));

  if (walletDoc.exists()) {
    return walletDoc.data() as Wallet;
  }

  return null;
}

async function saveWallet(wallet: Wallet, overwrite: booelan = false): Promise<boolean> {
  try {
    const walletDoc = await getDoc(doc(db, walletCollection, walletName));

    const walletExists = walletDoc.exists();
    if (walletExists && !overwrite) {
      return true
    }

    await setDoc(doc(collection(db, walletCollection), walletName), wallet);
    return true;
  } catch (e) {
    // handle error
    return false;
  }
}

let Keymaster: Keymaster; // global ref
async () => {
  Keymaster = new Keymaster({
    gatekeeperConfig: {
      url: "https://gatekeeper-url",
      waitUntilReady: true,
    },
    walletConfig: {
      id: "my-wallet"
    },
    walletDb: {
      loadWallet,
      saveWallet
    }
  });
  await Keymaster.start();
  return Keymaster;
}

app.post("/challenges", async (_, res) => {
   const callbackUrl = "http://your-server-url/auth";
   const challenge = await Keymaster.createChallenge({
     callback: callbackUrl,
   });

   res.json(challenge);
});

app.get("/auth", async (req, res) => {
  const challengeId = req.query.challenge;
  if (!challengeId || typeof challengeId !== "string") {
    return res.sendStatus(400);
  }

  const challengeDoc = await getDoc(doc(db, "challenges", challengeId));
  if (challengeDoc.exists()) {
    console.log("Found challenge document with ID", challengeId)
    const docData = challengeDoc.data()
    const userId = docData.responder
    const userDoc = await getDoc(doc(db, "users", userId));

    if (userDoc.exists()) {
      console.log("Found user document with ID", userId)
      const userData = userDoc.data()
      // authenticate session and return
      res.json(userData);
    }
  }

  res.sendStatus(404);
});

app.post("/auth", async (req, res) => {
  const { response } = req.body;
  const verified = await Keymaster.verifyResponse(response);

  if (verified.match)  {
    const challengeId = verified.challenge
    const userId = verified.responder

    // cache challenge
    await setDoc(doc(collection(db, "challenges"), challengeId), verified);
    console.log("Created challenge document with ID", userId);

    // create user
    await setDoc(doc(collection(db, "users"), userId), verified);
    console.log("Created user document with ID", userId);
  }

  res.sendStatus(204);
});

app.listen(8080, async () => {
  console.log(`Server listening on port ${8080}`);
});
6. UI Setup
Complete README can be found here: https://www.npmjs.com/package/@yourself_id/siwys-react-js
1. Install
npm install @yourself_id/siwys-react-js
or
yarn add @yourself_id/siwys-react-js
2. Render the SIWYS Button
The SiwysButton should be rendered for unauthenticated users and upon clicking it, should navigate to a dedicated page that will render the SignInWithYourSelf component.
<SiwysButton
  onClick={() => {
    // navigate to dedicated SIWYS page
  }}
  colorTheme="dark"
  glow
/>
The following are the acceptable props for the SiwysButton component:
| Parameter | Type | Description | Required | Default |
|---|---|---|---|---|
| colorTheme | string | Specify color theme. Either “light” or “dark” | No | Auto-detect |
| glow | boolean | Whether to show glow hover effect | No | False |
| onClick | func | Function to execute when clicked. Should redirect to a page containing the SignInWithYourSelf component | Yes |
3. Render SIWYS Component
The SignInWithYourSelf component includes the QR code for scanning as well as additional information to inform users on how to take action. Consequently, this component should ideally be rendered on its own dedicated page to avoid any formatting/styling issues.
<SignInWithYourSelf
  createChallengeUrl="https://your-sever-url/challenges"
  pollForChallengeComplete="https://your-server-url/auth"
  pollingIntervalSec={5}
  onChallengeComplete={(resp) => console.log("Auth Respone:", resp)}
/>
The following are the acceptable props for the SignInWithYourSelf component:
| Parameter | Type | Description | Required | Default |
|---|---|---|---|---|
| challengeDID | string | The DID for the challenge to be displayed in the component’s QR code. | true | |
| challengeBaseUrl | string | Optional prop to provide a base URL for challenges. This is rendered in the QR code and the app link SIWYS button. | false | empty string |
| onSiwywsPress | function | Optional callback for the SignInWithYourSelf component’s app link button | false | https://www.selfid.link/challenge?challenge=${challengeDID || ""} |
| isCYS | boolean | Optional prop to render the ContinueWithYourSelf button rather than the SignInWithYourSelf button. | false | false |
| createChallengeUrl | string | Optional prop for creating a challenge by the SignInWithYourSelf component. | false | undefined |
| pollForAuthUrl | string | Optional prop for polling for a challenge response by the SignInWithYourSelf component. | false | undefined |
| successComponent | React.Node | Optional react node to be rendered in the case that a handled poll returns a challenge response | false | undefined |
| theme | string | Optional prop to render a different theme. Options are “light” or “dark” | false | “light” |
4. Complete Example
The following is a complete, minimal example using Next.js. This assumes that the pollForChallengeCompleteUrl sets the appropriate authentication mechanism, eg a JWT cookie.
// index.tsx entrypoint
import React, { render, useEffect, useState } from "react"

import { useRouter } from 'next/router';

import { SiwysButton } from "@yourself_id/react-js";

const App: React.FC<{}> = () => {
  const [user, setUser] = useState();

  const router = useRouter();

  useEffect(() => {
    // fetch user info if authenticated
    fetch("/me").then(setUser)
  }, [])

  return (
    <div>
      {user && <Homepage />}
      {!user && (
        <SiwysButton
          colorTheme="dark"
          onClick={() => router.push("/login")}
        />
      )}
    </div>
  );
};

export default App;

render(<App />, document.getElementById('app')!)

// pages/login/index.tsx
import React, { render, useState } from "react"

import { SignInWithYourSelf } from "@yourself_id/react-js";

const Login: React.FC<{}> = () => {
  const router = useRouter();

  return (
    <SignInWithYourSelf
      createChallengeUrl="https://your-server-url/challenges"
      pollForChallengeCompleteUrl="https://your-server-url/auth"
      onChallengeComplete={() => router.push("/")}
    />
  );
};

export default Login;
7. Troubleshooting
Hank Brigham: hank.brigham@selfid.com
Christian Saucier: christian@selfid.com
8. UI/UX Best Practices
Button Design and Appearance:
-
Standard Button Usage: Utilize SELF’s pre-approved "Sign in with your SELF" button or QR code, to maintain consistency and user recognition.
-
Customization: If customization is necessary to align with your app's design, ensure the following:
- Size and Aspect Ratio: Scale the button as needed, preserving the aspect ratio to prevent distortion of the SELF logo.
- Color Scheme: Maintain the standard color for the SELF logo, ensuring it appears on a white background.
- Font: Employ the [X] font for button text to match SELF’s typographic standards.
Prominence and Placement:
- Equal Visibility: Display the "Sign in with your SELF" button as prominently as other third-party sign-in options, ensuring buttons are of similar size and visual weight.
Prohibited Practices:
- Logo Usage: Avoid using the SELF icon or logo alone without the accompanying button boundary and text that indicates the user action.
- Custom Icons: Do not create or use custom icons to represent SELF; always use the provided assets to maintain brand integrity.